How to use Git / GitHub with Jupyter Notebook
This is a basic guide, if you’re already familiar with Git, check out our advanced Git ↔ Jupyter guide.
Quick answer: Version-control Jupyter notebooks with standard Git — git add, git commit, git push. The hard part is review: notebooks are JSON, so GitHub’s diff is noisy and often fails to render for larger notebooks. To get readable diffs and cell-level pull request comments, teams use a notebook-aware tool like ReviewNB or nbdime.
This is a comprehensive Git tutorial for Jupyter Notebook users. Feel free to skip a section if you’re already familiar with it. At the end you’ll be able to -
- Push your notebooks to a GitHub repository
- Start versioning your notebooks
- Review Jupyter notebook pull requests on GitHub
- Learn how to revert to a specific notebook version
- Get feedback & discuss notebook changes with your peers
- Easily share your notebooks for others to view
Create GitHub Account
If you don’t have a GitHub account please create one here.
Setup Git Locally
- Download and install the latest version of Git.
-
Set your name and email — these are attached to every commit you make:
git config --global user.name "Mona Lisa" git config --global user.email "email@example.com" - Authenticate to GitHub using one of the methods below:
- GitHub CLI (easiest): install
ghand rungh auth login. It handles the token exchange and stores credentials for you. - SSH key: generate a key and add it to your GitHub account. Recommended if you push from multiple machines.
- Personal Access Token: create a fine-grained PAT and use it in place of a password when Git prompts for one.
- GitHub CLI (easiest): install
Create New Repository
A GitHub repository is like your supercharged folder in the cloud. You can store files (notebooks, data, source code), look at historical changes to these files, open issues, discuss changes and much more. People typically create one repository per project.
Let’s go ahead & create a repository on GitHub. Once created, you’ll see a page like below, copy the highlighted repository URL.
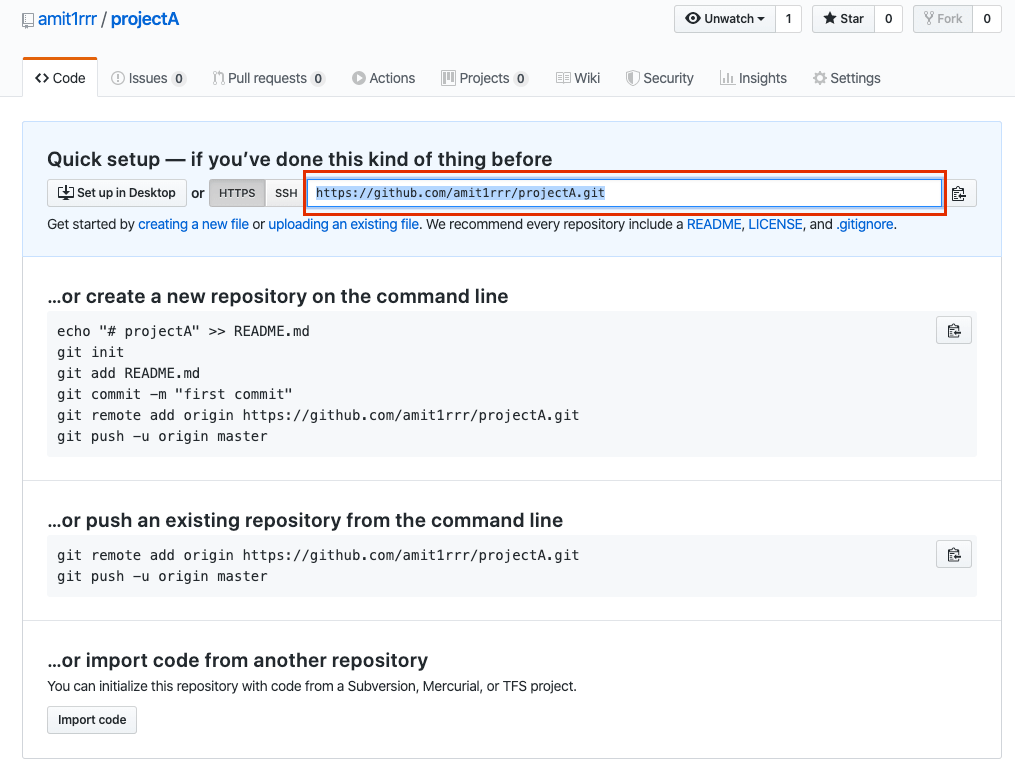
Clone Repository
Cloning copies the GitHub repo to your machine and links the local directory to the remote, so you can pull and push changes. Run:
# Creates a 'projectA' directory linked to the remote repo on GitHub.
git clone https://github.com/amit1rrr/projectA.git
Cloning into 'projectA'...
warning: You appear to have cloned an empty repository.
Push Notebooks to GitHub
The repository is empty right now. Copy two notebooks into the cloned directory:
cp /some/path/analysis1.ipynb /path/of/projectA/
cp /some/path/scratch.ipynb /path/of/projectA/
To push analysis1.ipynb to GitHub, first tell Git to start tracking it:
# Stages the file for the next commit.
git add analysis1.ipynb
Check which files are staged with git status:
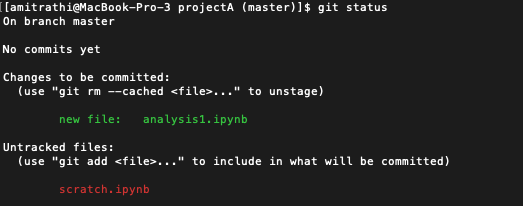
analysis1.ipynb is now under “Changes to be committed:”. Now let’s create the commit, a checkpoint you can revert to at any time:
# -m provides a short message describing the change.
git commit -m "Adds customer data analysis notebook"
Push the commit to GitHub:
# Sends new commits on the current branch to the remote.
git push
Visit the repository page on GitHub to see your commits.
Develop in a Branch
For work spanning multiple days, push work-in-progress commits to a feature branch as a backup. Each repo has a default branch (main) holding completed work; team members create their own feature branches, then open a pull request to review and merge their changes into the main branch.
Start a new branch for the analysis:
# Creates a new branch and switches to it.
git checkout -b customer_data_insights
Edit your notebooks — by hand or with an AI assistant like Claude Code — then git add, git commit, git push. The first push fails because the branch doesn’t exist on GitHub yet:

Push the branch and set its upstream — the command is in the error message:
# Creates the branch on GitHub and links it as the upstream for future pushes.
git push --set-upstream origin customer_data_insights
Subsequent git push succeeds.
Create Pull Request
Let’s say you’ve been working on feature branch for a while, and it’s ready for prime time. Most likely, you’d want to first share it with your peers, get their feedback before merging it into the main branch. That’s what pull requests are for.
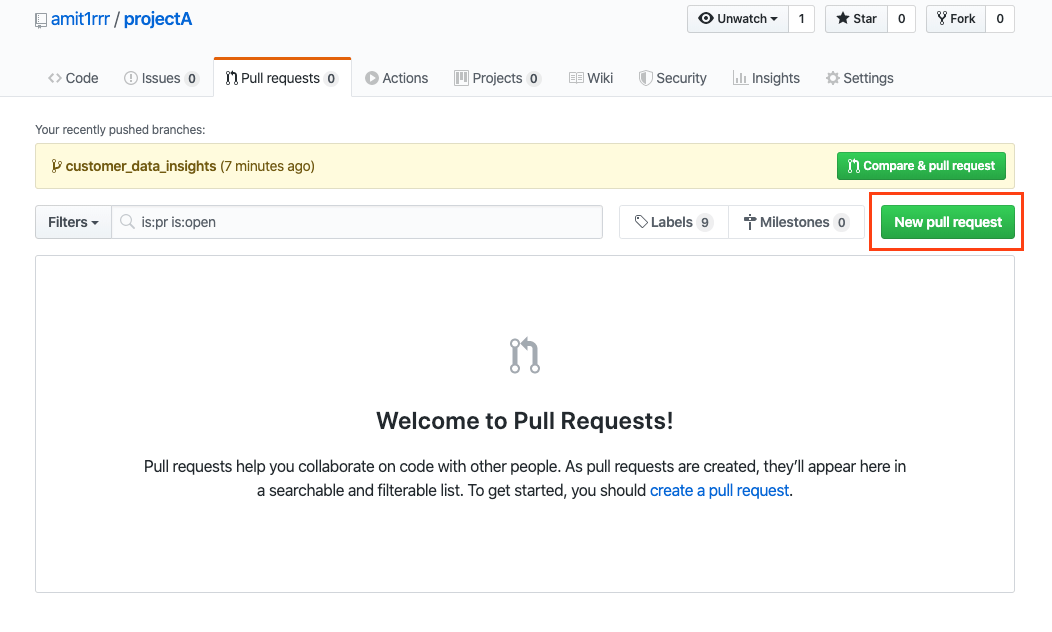
You can create pull requests from GitHub UI. Go to your Project page -> Pull requests tab -> click “New pull request”.
Choose which branch you’d like to merge into main or master. Verify commits & list of files changed. Click “Create pull request”.

On the next page provide title, describe your changes in brief & click “Create pull request” again.

Why GitHub’s native notebook viewer isn’t enough
GitHub renders .ipynb files as HTML when you browse them, and in 2023 it introduced rich notebook diffs built on nbdime. Years later, the rich notebook diff is still an opt-in feature preview, not a default. GitHub’s rich diff has three specific issues:
- You can’t comment on the rich diff. The rich diff view is read-only — to leave a review comment you have to switch back to the raw JSON diff. GitHub does not allow commenting on rich notebook diff.
- Large notebooks fail to render. GitHub gives up above an internal size threshold and shows raw JSON or a “Sorry, something went wrong” error. See why notebooks fail to render on GitHub for the breakdown.
- Interactive widgets don’t run. GitHub strips JavaScript, so Plotly, ipywidgets, Bokeh, and other rich outputs do not render.
How the common notebook review tools compare
| GitHub native | nbdime | JupyterLab Git | ReviewNB | |
|---|---|---|---|---|
| Rich notebook diff | Limited (fails on large notebooks) | Yes | Yes | Yes |
| Interactive widget rendering | No | Local-only | Local-only | On-GitHub-PR |
| Cell-level PR comments | No | N/A | N/A | Yes |
| Threaded review discussions | No (file-level only) | N/A | N/A | Yes |
| Where it runs | github.com | Local CLI / browser | Inside JupyterLab | github.com (GitHub App) |
| Setup | None | pip install nbdime |
JupyterLab extension | One-click GitHub App install |
These tools aren’t mutually exclusive — they solve different parts of the problem. For reviewing local changes before you push, nbdime is the standard choice, and the JupyterLab Git extension wraps it in a GUI. For reviewing pull requests on GitHub with cell-level comments, ReviewNB is the only one of these that operates at the PR level.
Review Notebook Pull Request
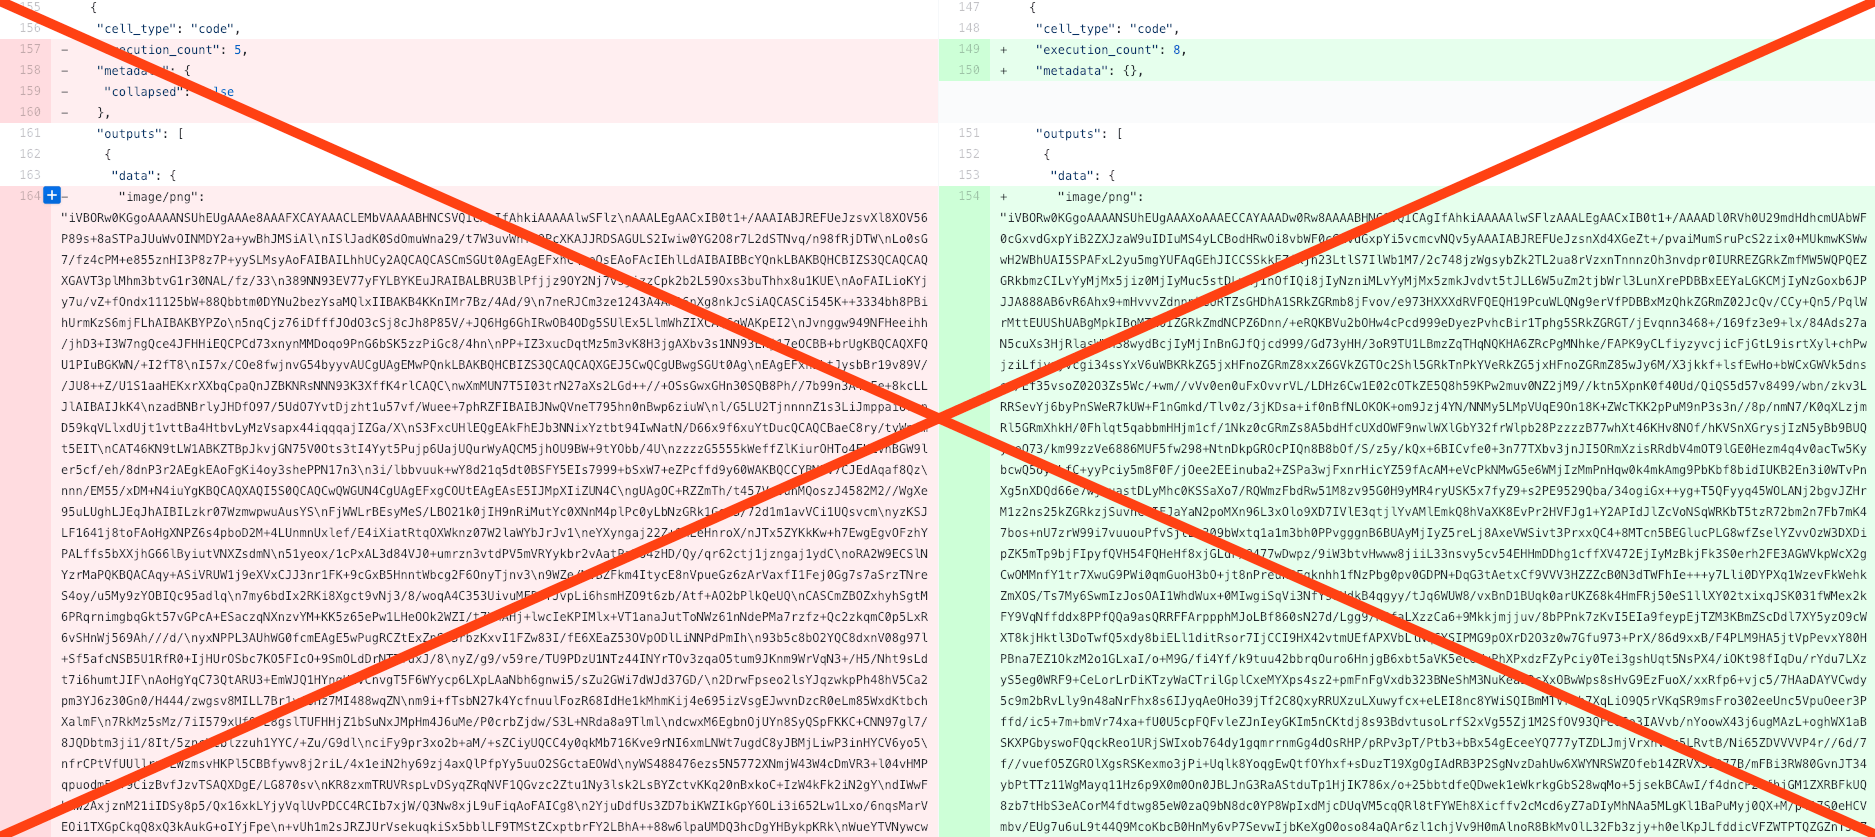
GitHub pull requests let reviewers see changes side-by-side and comment on them. For Jupyter notebooks, the default PR view is a raw JSON diff (below) that’s hard to read.
GitHub’s rich diff renders most small notebooks but still fails on larger ones. See the rendering problem in detail and a workaround gist.
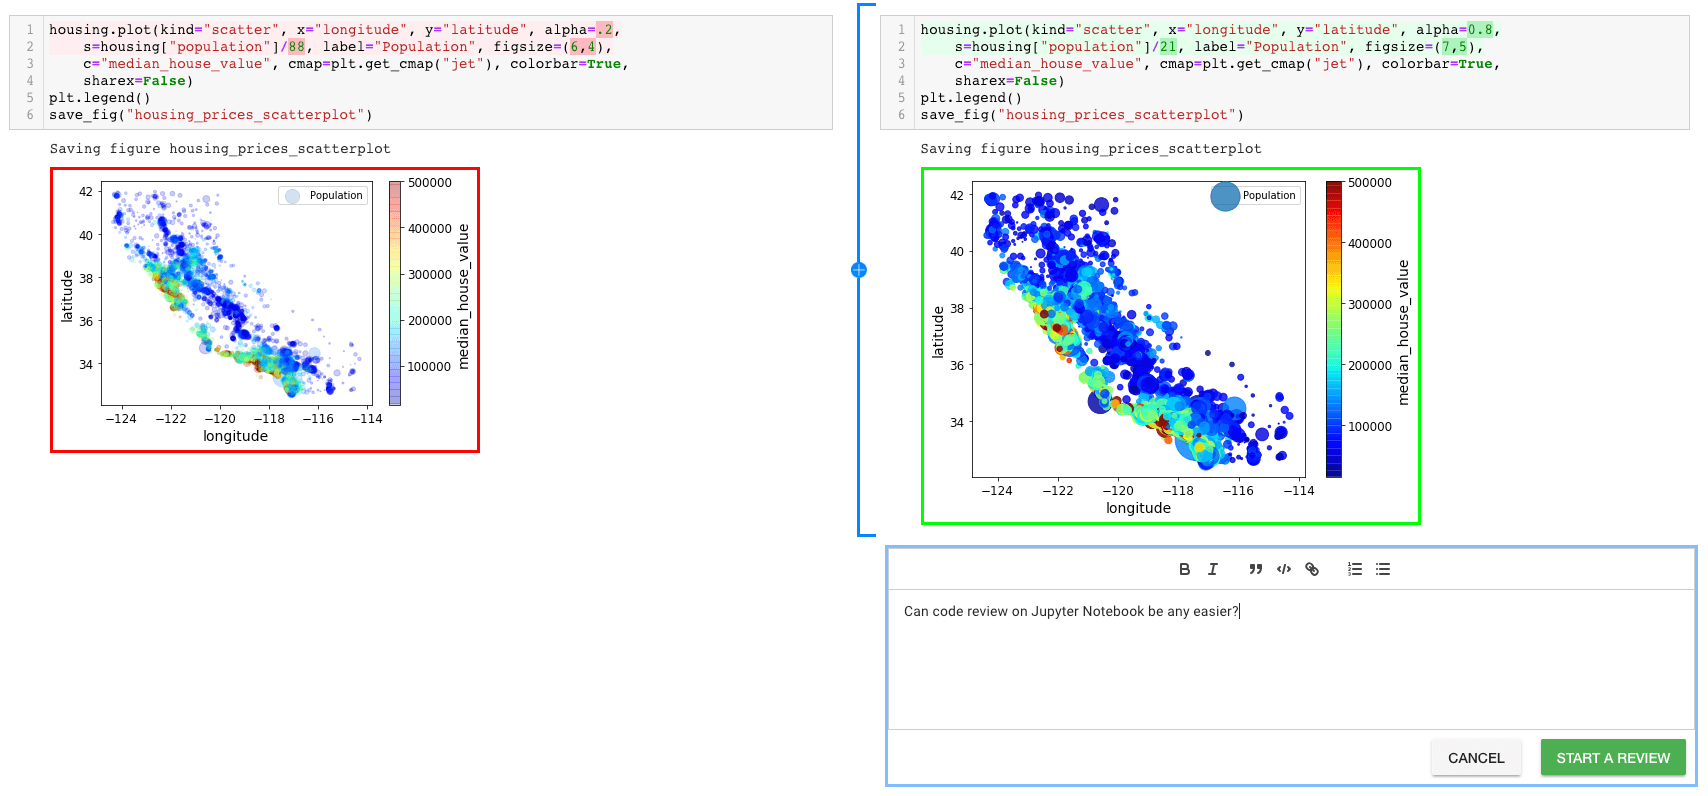
ReviewNB renders large notebooks GitHub can’t and supports threaded cell-level comments on every PR. Install it on a repo in two clicks via the GitHub Marketplace.
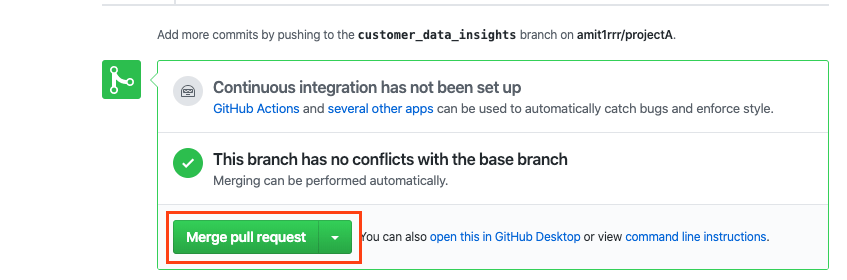
Once your changes are approved you can merge them from the GitHub UI.
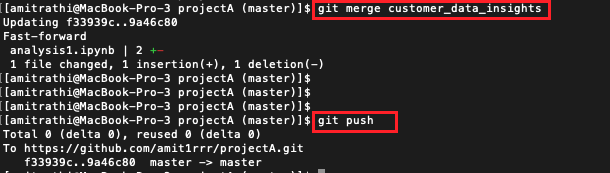
Or run git merge + git push from command line,
Revert to a specific notebook version
If you want to temporarily go back to a commit, checkout the files, and come back to where you are then you can simply checkout the desired commit. At the end run “git checkout main” to go back to the current state.
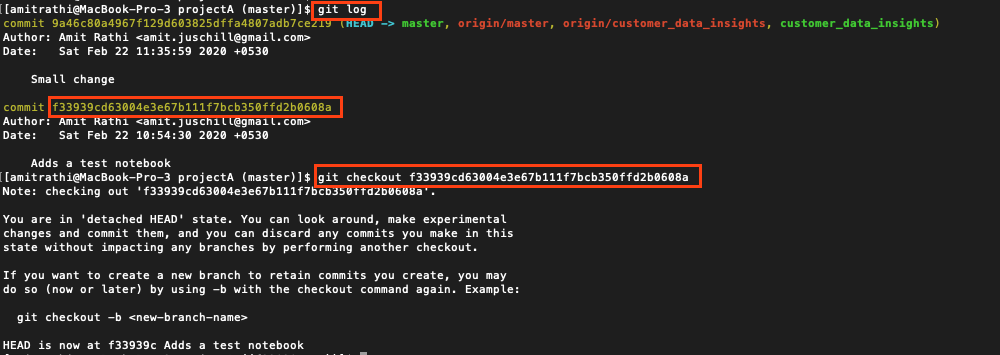
To actually revert to an old state and make changes there, start a new branch from that commit:
# Starts a branch at the given commit, leaving main untouched.
git checkout -b old-state f33939cd63004e3e67b111f7bcb350ffd2b0608a
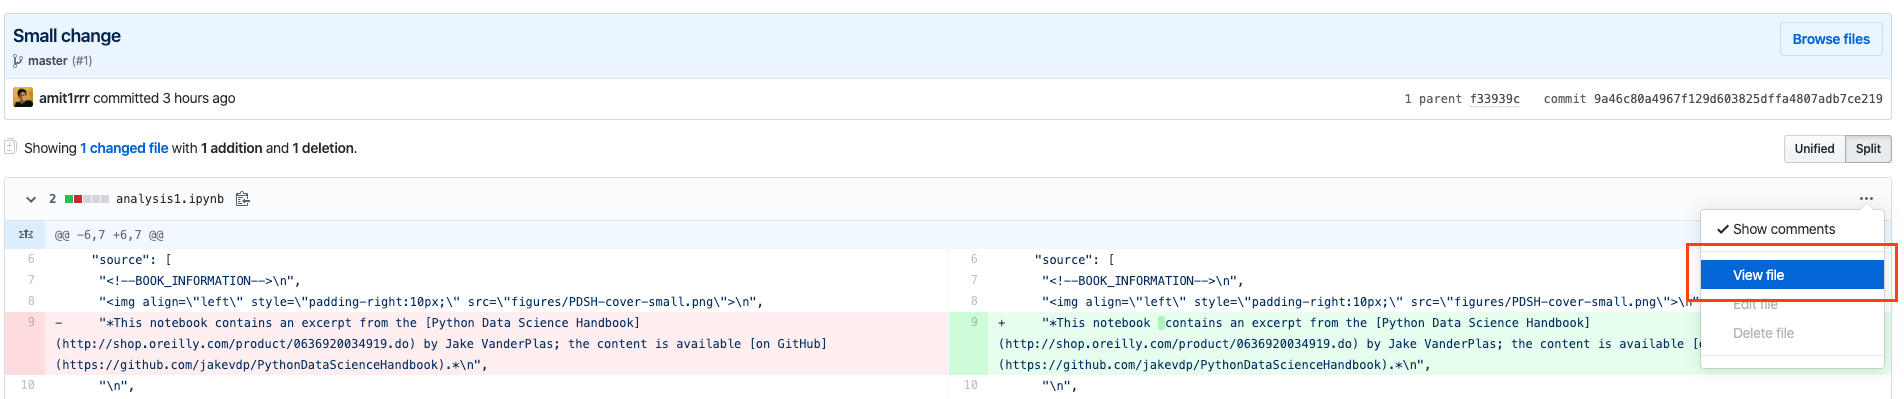
You can also browse old commits on GitHub by going to Your project page -> Commits. Open the desired commit and click “View File” to see the notebook at that point in history.
Share read-only links to your notebook
When you browse notebooks in your repository on GitHub it renders them as HTML. So it’s very convenient to share read-only links to the notebook like this one. If it’s a private repository, the person you are sharing the link with needs to have a GitHub account and have permission to access your repository.
For security reasons, GitHub does not run any Javascript in the notebook. You can use nbviewer or ReviewNB if your notebook contains interactive widgets and such.
FAQ
Can I diff Jupyter notebooks on GitHub?
Yes, but it’s not on by default. GitHub offers rich diff for .ipynb files in pull requests as an opt-in feature preview. It works for small to medium notebooks but often fails on larger ones, falling back to an unreadable raw JSON diff — and you can’t leave review comments on GitHub rich diff. For consistent diffs at any size plus cell-level commenting, ReviewNB is the most common alternative.
Why does my notebook fail to render on GitHub?
GitHub stops rendering above an internal size threshold and shows raw JSON or an error. Large embedded outputs — images, dataframes, plots — push notebooks over the limit quickly. See the full breakdown.
Should I commit .ipynb outputs to Git?
There’s no single right answer. Committing outputs preserves a record of results and keeps the notebook readable on GitHub without re-running it. The main costs are a larger repo (image outputs are stored as base64) and messier merge conflicts. Noisy diffs are often cited as a third cost, but a notebook-aware review tool like ReviewNB renders output diffs cleanly, so that problem largely goes away.
How do I review notebook pull requests?
GitHub’s PR view shows the rich diff but doesn’t support comments pinned to individual cells. To leave cell-level comments that persist across new commits, install ReviewNB on the repo — it adds a review interface on top of GitHub PRs with rich diffs and per-cell threaded comments. See the full walkthrough.
How do I resolve merge conflicts in a Jupyter notebook?
Notebook merge conflicts are painful because the .ipynb JSON format produces conflict markers in the middle of cell metadata and base64 output, which are nearly impossible to resolve by hand. Use a notebook-aware merge tool instead: nbdime’s nbmerge does a three-way merge with automatic conflict resolution, and the JupyterLab Git extension exposes the same thing in a GUI. See the merge conflict walkthrough in the advanced guide for the step-by-step.
Can I comment on individual notebook cells in a GitHub PR?
Not with GitHub’s built-in PR review. You can comment on the file as a whole, but the comments don’t pin to a specific cell. ReviewNB enables cell-level commenting on top of GitHub PRs.
What’s the difference between nbdime, JupyterLab Git, and ReviewNB?
nbdime is a local CLI/browser tool for diffing and merging notebooks on your machine. JupyterLab Git is a JupyterLab extension that adds a Git UI inside JupyterLab. ReviewNB is a GitHub App that adds rich diffs and cell-level PR comments on github.com — built for team code review on pull requests, not local diffing.
Conclusion
Git’s command surface is wide, but the day-to-day workflow for notebooks is the same five commands: clone, add, commit, push, and pull. The remaining friction is reviewing notebook changes — install ReviewNB on your GitHub repo to get rich diffs and cell-level PR comments. Teams at Apple, Airbnb, Spotify, and NASA JPL use it for notebook code review, and it’s free for open source and education.
For more advanced workflows — output stripping, merge conflict resolution, nbdev/jupytext setups — see the advanced Git ↔ Jupyter guide. If you’re using AI assistants to write notebooks, see our guide on using Claude Code with Jupyter notebooks.
Happy Hacking!